
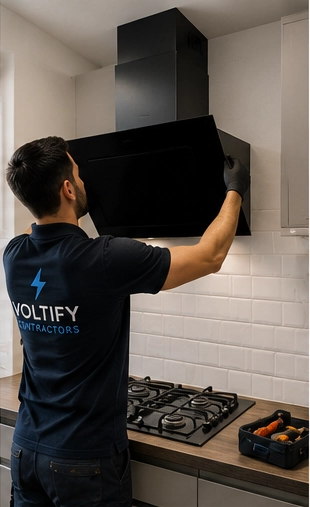
A cooker hood either sends steam, grease and cooking smells outside through a duct, or filters the air and blows it back into the kitchen. Which of those your kitchen can support decides most of what a cooker hood installation involves, from the style of hood you can choose to how much work goes on above the wall units.
Voltify Contractors fits chimney, integrated, visor and island hoods in homes and rented properties across East and South-East London, including Canary Wharf (E14), Canning Town (E16), Bow (E3), Stratford (E15), Greenwich (SE10), Woolwich (SE18) and Barking (IG11), as part of our appliance installation service. This page explains the choices that matter before you buy and the checks made before a hood goes up.
Ducted or Recirculating: The Decision That Shapes the Job
| What differs | Ducted (extracting) | Recirculating |
|---|---|---|
| How it works | Air is drawn through grease filters and pushed outside through a duct and wall or roof vent | Air passes through grease filters and carbon filters, then returns to the kitchen |
| What it removes | Steam, heat, grease and smells | Grease and most smells; moisture and heat stay in the room |
| What the installation needs | A route for the duct to an outside wall or roof, and a vent on the outside | No duct to the outside; just the fixing and a power supply |
| Ongoing upkeep | Clean or replace the grease filters | Clean the grease filters and replace the carbon filters as the manufacturer advises |
Ducting to the outside is the more effective option, particularly in a small kitchen or one that gets condensation. It is only practical if there is a reasonable route to an outside wall. In a flat, an internal kitchen or where the hood sits on an island far from any external wall, recirculating is often the realistic choice. Many hoods can be set up either way, so check the product details for the mode you need and whether a carbon filter kit is included.
Choosing a Hood Style for Your Kitchen
The style affects where the fixings go and how the duct and cable are hidden:
- Chimney hoods fix to the wall above the hob, with a decorative chimney cover hiding the duct and cable. The cover has to suit your ceiling height; a very high or very low ceiling may need an extension piece or a shortened cover.
- Integrated or canopy hoods are built into a wall unit above the hob, so the cabinet has to match the hood’s cut-out size. Where the kitchen is already fitted, the unit may need altering or replacing.
- Visor and slimline hoods fit beneath a wall unit or on the wall with a flip-out visor. They are compact but usually move less air than a full chimney hood.
- Island and ceiling hoods hang from the ceiling over a hob on an island or peninsula. They need a secure fixing into the ceiling structure, and the duct usually runs through the ceiling void.
- Downdraft hoods rise out of the worktop behind the hob. They take up space inside the base unit below and depend closely on the hob and worktop layout.
Height and Width Above the Hob
The hood and hob manufacturers each set a minimum distance between the hob surface and the underside of the hood. The figure is usually greater for a gas hob than for an electric or induction one, and where the two instructions differ, the larger distance applies. Fitting the hood too low is a fire risk with gas and can scorch the underside; fitting it too high means it captures far less of the steam and smoke.
The hood should normally be at least as wide as the hob, and centred over it. If you are replacing a hob at the same time, it is worth fixing the hob position first; our hob installation page covers the cut-out and clearances on that side. For a freestanding cooker, a taller new cooker can reduce the gap to an existing hood, which is one of the checks on our cooker installation page.
Planning the Duct Route
A ducted hood performs only as well as the duct behind it. The things that most affect it are:
- Duct size. The duct should match the size of the hood’s outlet. Reducing it to fit an existing hole or a smaller vent restricts airflow and makes the hood noisier.
- Length and bends. Every bend and every extra metre reduces extraction. The shortest, straightest route to an outside wall is the aim.
- Rigid or flexible duct. Smooth rigid ducting moves air more efficiently than flexible hose, which is best kept to short connecting lengths.
- The outside vent. A wall vent with a back-draught flap stops cold air and draughts coming back in when the hood is off.
Where there is already a vent in the right place, a replacement hood can often use it. Where a new opening through an external wall is needed, the route and the wall construction are assessed on site before the work is agreed. In a leasehold flat, a new hole through an outside wall may need the freeholder’s permission, so it is worth checking that before you order a ducted hood. A duct should always finish outside, never in a loft or ceiling void.
Powering the Hood
Most cooker hoods run from a standard 13A supply, either on a plug or wired into a fused connection. The connection point is normally hidden inside the chimney cover or the wall unit, with a switch you can reach so the hood can be isolated for cleaning or repairs. If there is no supply in the right place, a new socket or fused spur is added as part of our electrical services. Hoods with lighting or remote controls still use the same supply; the check is simply that the connection is in the right place and within the hood’s rating.
A cooker hood is not the same as a wall or window extractor fan. If you are thinking about a fan rather than a hood, for example in a small galley kitchen with no room for one, see our extractor fan installation page.
Can You Fit a Recirculating Cooker Hood Yourself?
Often, yes, if you are handy with a drill and the hood plugs into a socket that is already in the right place. A recirculating hood needs no hole through the wall. The job is marking the height and centre line, fixing the wall bracket, hanging the hood, fitting the carbon filters and setting the chimney cover or deflector so the cleaned air comes back into the kitchen.
It stops being a straightforward DIY job when:
- the hood is heavy and the wall is plasterboard or uneven, so the fixings have to be matched to the load;
- there is no switched supply where the hood will sit, and a fused spur or socket has to be added;
- you want to switch to ducted extraction, which means cutting through an outside wall and fitting a vent;
- the hood hangs from the ceiling over an island, where the fixing has to go into the ceiling structure.
If any of those apply, or you would rather not hold a hood above a hob on your own, send us the model number and a photo of the wall and we can talk it through.
Cooker Hood Installation Near Gas and Other Fuel-Burning Appliances
If the kitchen, or a room connected to it, has an open-flued appliance, such as some older gas boilers, a gas fire or a wood burner, a powerful ducted hood can draw fumes back down the flue into the room. Hood manufacturers set out requirements for this in their instructions. Mention any open-flued appliance when you get in touch, and have a Gas Safe registered engineer check a gas appliance where the instructions call for it. Room-sealed boilers, which draw their air from outside, are not affected in the same way.
Replacing an Existing Hood
A like-for-like swap is usually the simplest cooker hood installation. It becomes more involved when the new hood:
- has a different fixing pattern, so old holes need filling and new fixings go into sound wall;
- is wider or narrower than the old one, leaving a gap in the tiles or splashback;
- has a larger outlet than the existing duct and vent;
- is heavier, so a plasterboard wall needs fixings or support suited to the weight;
- changes from recirculating to ducted, which means creating a duct route for the first time.
Small making-good jobs around the old hood, such as filling holes or adjusting a wall unit, can be combined through our handyman and property maintenance service. For hoods built into kitchen cabinetry, the alignment checks are similar to those on our integrated appliance installation page.
On the Day: How a Cooker Hood Gets Fitted
No two kitchens are quite the same, but a fitting visit generally runs in this order:
- Confirm the hob type and position against the hood instructions, then mark the fixing height and the centre line.
- Take down the old hood if there is one, and take it away for disposal if you would like us to.
- Check the wall or ceiling for hidden cables and pipes, then fix the bracket or mounting frame to suit the hood’s weight.
- Connect the duct to the hood outlet and the outside vent, or fit the carbon filters and air deflector for recirculation.
- Make the electrical connection, fit the chimney cover or trim, then run the fan on every speed and check the lights and controls.
If the hood needs a new supply or a new wall vent, that is talked through with you before any extra work goes ahead.
What Affects the Cost of Fitting a Cooker Hood
The documented minimum call-out is £80 for the first hour. Replacing a recirculating hood on existing fixings with a plug-in supply is at the simpler end. The cost rises when a new duct route or wall vent is needed, the chimney cover needs adapting, the hood has to be fixed to a ceiling or plasterboard wall, or a new electrical supply is required. Ducting, vents, fixings and carbon filters are not included in the call-out minimum.
To get a useful answer quickly, send the model number of the new hood, a photo of the wall above the hob, the distance from the hob to the ceiling, and whether there is an existing vent to the outside. Contact Voltify Contractors to talk it through, or check the areas we cover.